顯示具有 工程 標籤的文章。 顯示所有文章

2012年10月23日 星期二

Dipole/Monopole 雙極單極天線的一些特性

天線要能有效率的 radiate, 最好有 common mode signal oscillation, 因為對應的 ground 在無限遠處。  Differential signal oscillation to the first order 會互相抵消,效率會比 common mode signal oscillation 差。  因為 charge 永遠是電中性,只有 differential charge oscillation (如dipole oscillation), 不會有 common mode charge oscillation.   Current 則可以有 differential current oscillation (如 small loop) 以及 common mode current oscillation.   

Very short dipole antenna 只有 differential charge/voltage oscillation,和 small loop antenna 只有 differential current oscillation 恰好是對偶性 (duality),兩者的效率都很差。如 Table 1.

image

Table 1: Short dipole antenna and small loop antenna. (Dl = l/4 for half wavelength antenna)

Dipole antenna 利用 dipole 長度增加而產生 common mode current radiation, 如下圖 2.  Dipole antenna 最大效率的 common mode radiation 是在長度為 l/2。

長度再更長反而 current 會互相抵消,效率並不會增加。但 radiation pattern 會更集中在一些角度,又稱之為"開花" ,實務上並不常使用。理想的 dipole antenna 是 l/2, 即半波長雙極天線,遠場如下,比 short dipole antenna 公式算出略高,主要是 current distribution 為 sine instead of triangular。或者更常見的,用 l/4 的 monopole 加上 ground plane mirror. 

fields from a half-wave dipole antenna

Table 2: Half wavelength dipole antenna.

幾個需要注意的點:

1. monopole 必需是垂直於 ground plane, 而非水平。水平反而會讓 common mode current 變為 differential current, 而抵消 radiation, 變成 small loop antenna.  這也是 RFID 或 Etag 必需要遠離大片金屬的原因,因為 RFID 或 Etag 都是水平貼於表面。

2. 電路產生的 EMI 多半為 common mode noise, 很容易 couple 到 dipole antenna.  最好的解決方法是在 noise source 上做 common mode choke 或 shielding. 

3. Dipole antenna 的 differential feed is easy to understand, but how coax feed? or single-ended signal feed?


chart!


如何縮短天線大小

Dipole/monopole 雖然簡單有效,實務上常常遇到的問題是如何縮小天線的尺寸,可以 fit 到機構內。特別對於 sub 1GHz 的 mobile 或 portable 應用 (UHF, GSM-900MHz, ISM-900MHz, LTE-700MHz), 如果有一或兩根突出的天線,不但不美觀,也不安全。如果能 embed 到機構中,更符合美觀和 MIMO 的應用。常用縮短天線的方法:

1. Use monopole instead of dipole: 50% length reduction, refere the previous article for the trade-off between dipole and monopole antenna.

2. Use Meander line structure:   The meander-line antenna (MLA) can be in a l/2 dipole or l/4 ground plane format.  The idea is to fold the conductors back and forth to make the overall antenna shorter, which is shown in the following figure.  It is a smaller area, but the radiation resistance, efficiency and bandwidth decease.  The parameters of meander shape will affect the antenna performance parameter.  More details about MLA is in the next section.

image            image


Meander Line Antenna (MLA)

Meander line antenna is one type of the micro strip antenna. The meander line antenna was proposed by Rashed and Tai for reduce the resonant length. Meandering the patch increases the path over which the surface current flows and that eventually results in lowering of the resonant frequency than the straight wire antenna of same dimensions.

The electrical small antenna defines as the largest dimension of the antenna is no more than one-tenth of a wavelength [5]. Meander antenna is electrically small antenna .The design of meander line antenna is a set of horizontal and vertical lines. Combination of horizontal and vertical lines forms turns. Number of turns increases efficiency increases. In case of meander line if meander spacing is increase resonant frequency decreases. At the same meander separation increase resonant frequency decreases [6]. A meander antenna is an extension of the basic folded antenna and frequencies much lower than resonances of a single element antenna of equal length.
Radiation efficiency of meander line antenna is good as compare to conventional half and quarter wavelength antennas. Antenna size reduction factor β depends primarily on the number of meander elements per wavelength and spacing of element widths of the rectangular loops [7].

image


Meander line structure to shorten the size; but trade with efficiency

Live antenna vs. dead antenna


Injection power = Ohmic loss + non-radiation mode + radiating mode

where is the power of non-radiating mode?  loss again?

why long wavelength has better power in Friss formula


How to deal with Antenna?  Any simplified Maxwell equation?

Meander line antenna (MLA) equivalent circuit.

2011年2月13日 星期日

Matlab 替代方案

Matlab 毫無疑問是最常用的 computation 及 DSP 的軟體。大概也是我從大學以來使用程度最高的 programming language.  (其次是 perl,甚少用 C 或其它語言)  主要的好處 :

* Easy to use:  No malloc of array; matrix and vector operation; dynamic typing

* Complete DSP functions: windowing, fft, etc.

* Very nice graphics

主要的缺陷 :

1. Cost

2. Lack of general purpose programming language capability

3. Hard to integrate with other tools (such as verilog PLI) and do batch job.  Always need to open the matlab

I was looking for the right solution.   Octave is almost the same as Matlab as far as my work is concerned.  It only solved the cost part.

Pylab

Python is another alternative.   However, I found it’s difficult to use at beginning even with NumPy, SciPy, and Matplotlib.   For example, you need to do a=Vector([1, 2, 3]) instead of  a=[1,2,3].  Not mentioned to install the right tools.

The key is to Pylab (similar to Matlab) combines NumPy, SciPy, Matplotlib into an integrated  and consistent environment.  Pylab is an interactive mode of IPython (#ipython –pylab) similar to Matlab.

The most import thing is:

from pylab import *

Based on KeirMierle’s viewpoint, Pylab still needs to resolve these API consistency and installation issues.

Three Distributions Targeting Scientific Computing

Then I found the following three distributions based on Python

1. Sage: good for linux, maybe not easy for windows (use ?? as console)

2. Pythonxy: good for windows, maybe not good for linux (use Eclipse/IPython/Spyderlib as console)

3. Enthought Python Distribution (EPD): both for linux and windows.  The founder is the developer of NumPy (use IPython as console)

I found it’s very easy to use:

Cons:

1. First, the size of each distributin is huge.  For example, EPD 7.0 has 250MB.  Sage is similar, if not larger. 

2. EPD only support the lastest built.  EPD7.0 needs to use > glibc2.5.  That is, RHEL 5 or above.  For RHEL 4 you need to pay to get the old distribution.  Similar things may happen in other distribution.


Theerefore, alternative is to build your own environment (as many people have done it before).

The most essential part is: python, numpy, scipy, matplotlib, ipython (pylab), and maybe wxpython.


Installatin Procedure

Step1: Install python 2.6.5 (Matlibplot requires python 2.4-2.7) 

* Make sure installed python NOT overwrite /usr/bin/python since RHEL uses old python for lots of system scripts.

Step2: Use python2.6.5 to install easy_install for other python packages installation.

Step3: Use easy_install for NumPy

Step3b: Use easy_install for SciPy.  However, it seems to require fortran; encounter problems and skip.

Step4: Use easy_install for Matplotlib

* Matplotlib requires python 2.4-2.7

* NumPy 1.1 or later

* libpng 1.1 or later –> Use: “yum install libpng-devel”

* freetype 1.4 or later

Step5: Use easy_install for ipython

Step6: Add path (../bin before /usr/bin for python)

Run “ipython –pylab” for ipython in pylab mode.


The whole thing is summarized in the following shell script.

--------------------------------------------------------------------

#! /bin/sh

builddir=$(pwd)/pythondist
mkdir -p $builddir/source
cd $builddir/source

# Step1
wget 'http://python.org/ftp/python/2.6.5/Python-2.6.5.tgz'
wget 'http://pypi.python.org/packages/source/s/setuptools/setuptools-0.6c11.tar.gz#md5=7df2a529a074f613b509fb44feefe74e'
tar -xvzf Python-2.6.5.tgz

# Build python
cd $builddir/source/Python-2.6.5/

# The --prefix argument is the key!
./configure --prefix=$builddir

# Be sure to speed things up with the -j option if you're
# on a multicore machine (e.g. make -j 4 build for a quadcore)
make build
make install

# Step2
# Now install setuptools
cd $builddir/source
tar -xvzf setuptools-0.6c11.tar.gz
cd setuptools-0.6c11/

# The next key is to call this with the python you just built!
$builddir/bin/python setup.py build
$builddir/bin/python setup.py install

# Step3-5
# Now just install numpy, scipy, ipython, matplotlib, etc through easy_install
$builddir/bin/easy_install numpy
$builddir/bin/easy_install scipy
$builddir/bin/easy_install matplotlib
$builddir/bin/easy_install ipython

---------------------------------------------------------------------------------------------------


Testing Example

from pylab import *

x = linspace(0, 1000, 1024)

y = sin(x)

win = kaiser(x.size, 12)

plot(x, 20*log10(abs(fft(y*win))))

grid(1)

axis([0, 1, 0, 1])


Almost identical to matlab and very easy to use.

2009年10月17日 星期六

免費 RF 軟體及阻抗匹配 (Impedance Matching)

常用的 RF Simulation 軟體如 ADS, Microwave Office, 或是 SpectreRF 動則數十萬。對於大多數 RF 工程師日常的工作實在是大材(財)小用。

本文想要介紹兩個好用而且免費的 RF simulation 軟體,以及如何用這兩個軟體來做阻抗匹配。

第一個軟體是 Smith,是由 Bern 大學的 Fritz Dellsperger 教授所提供。正式版收費 $100 元;demo 版免費,但只能用五個元件而且不能存檔。說實在話這個軟體並不值得花錢買,也只能做一些簡單的事。五個元件也差不多夠用,因此只要用 demod 版就可以了。我先用 Smith 來介紹 Smith Chart 以及幾個阻抗匹配的做法。

Smith Chart 基本介紹

可參考另一篇文章 "Smith Chart"。重點摘要如下:

1.  Open load 位於 (+1, 0), Short load 位於 (-1, 0), 50Ohm load 位於 (0, 0).

2. 上半平面為 inductive load; 下半平面為 capacitive load; x-axis 為 resistive load.  因此大多 DC open 電路的 S11 位於第四象限 (如 dipole antenna); DC short 電路的 S11 位於第二象限。

3. VSWR = constant 在 smith chart 上是圓心在 (0, 0) 的圓。 Q=constant 在 smith chart 上是橄欖形,兩端點位於 (-1, 0) 和 (+1, 0)。


Smith 軟體介紹

Smith 軟體最大的缺點是只能觀察一個頻點,不過這也讓設計變得簡單而且容易了解。

Step 1: 輸入 ZL (load impedance)

開啟 smith 之後,先鍵入 ZL。有兩種方法輸入 ZL: 如果知道 ZL, 可以直接輸入 ZL 的實部 (resistive load) 和虛部 (reactive load),如圖一;實際的情形大多是 network analyzer 量測出的 S11 參數,也可以選 reflection coefficient 配合 polar 座標輸入,如圖二。  不論是用 ZL 或 reflection coefficient, 都必須提供工作頻率。

copy 1 of smith tutorial 1

圖一: 直接輸入 ZL (load impedance) 的實部和虛部: 實部是 84.8 Ohm (resistive load), 虛部是 -125.1 Ohm (capacitive load)。


smith tutorial 2 

圖二: 輸入 S11 參數的 magnitude 和 angle。Magnitude 是 0.706, Angle 部份是 -31.6 度。ZL 值圖一相同。


Step 2: L-match with HPF 和 LPF

最簡單的 match 就是 L-match。一般而言 L-match 可以有四種方式如圖三。分別是相交在 R=50 或 G=0.02 circles。除此之外,可以相交在 capacitive 半平面或是 inductive 半平面,一共有四種組合。

image

圖三:L match 的四種組合。


實際的情況則多半是在 R>50 (或 G>0.02) 的圓內,如 dipole antenna 和 loop anenna。此時只會有兩種 L-match 。如圖四和圖五所示,RL = 84.8 - 125.1 j, 只能先並聯電感或電容和 R=50 圓相交。再串聯電容或電感完成 input matching.  仔細觀察這兩種 L-match, 圖四是 HPF,因為串聯電容及並聯電感。圖五則是 LPF,因為串聯電感及並聯電容。至於應該用那一種 L-match,由系統決定。例如,如果要濾掉 FM 干擾,應該用 HPF L-match;反之,如果要濾掉 GSM 干擾,則應該用 LPF L-match。

smith tutorial 2 - HPF matching

圖四:L-match 使用 HPF。

 smith tutorial 2 - LPF matching

圖五:L-match 使用 LPF。


L-match 理論和應用都簡單,除了達到阻抗匹配之外,還附送了一個 HPF 或 LPF。對於窄頻系統效果相當不錯。

所謂窄頻系統就是頻寬小於載波的 10%。例如藍芽, WiFi 等使用 2.4 GHz ISM band,系統頻寬遠小於 240MHz。相反的,電視所使用的 UHF (或 VHF),頻寬從 470MHz 到 850MHz,遠遠超過載波的10%,因此是寬頻系統。

L-match 的主要缺點是只針對一個頻點做 matching。雖然對於窄頻系統效果不錯,但對寬頻系統遠端頻點的 matching/LPF/HPF 可能就不夠理想。同時在做 L-match 時,系統的 Q 值可能會變大 (寬頻會差異大,group delay 變化會增加,最好 Q=0),對某一些系統不適合。另外有時系統需要 BPF 來濾掉所有的干擾。一個解決之道就是用 Pi 或 T-match。


Step 3: Pi-match 和 T-match with BPF

首先把虛部去掉 --> 84.8 - 125.1j ==> 84.8 Ohm。這可以降低 Q 值同時離 50Ohm 更近一步。因為 Zl 是 capacitive loading,一開始只能使用 serial L,限制為 T match 且加上一個 LPF。

接下來再使用 L-match,把 84.8 Ohm map 到 50 Ohm。有 LPF 和 HPF 兩種選擇。

T-match LPF

上圖是 T-match 的 LPF (LPF + L-match LPF)。下圖則是 T-match 的 BPF (LPF + L-match HPF)。

Screenshot - 20091107 - 211805


究竟用 T-match (或 pi-match) 有什麼好處?主要是能將 matching 和 filter 的 Q 值分開。可以達成更寬頻的 impedance matching。

什麼時候會用 T-match 或 pi-match?當 impedance 實部大於 50-Ohm,原則上使用 T-match。當 admittance 實部大於 20mS,原則上使用 pi-match。 如上圖的黃和藍兩圈之內的部份。之外的部份,似乎用 L-match 就可以,不用做 T-match 或 pi-match。

當然可以做更複雜的變化,如 cascade 幾個 T 或 pi 或混合 T 和 Pi match,最主要的目的是達到多點的 impedance matching,比處不討論。

Smith 的 L-match 和 T-match 都是以單點為基礎,雖然簡單,但很難契合實做的需要。 RFSim99 剛好補足這一點。更重要的是,RFSim99 是一個完全免費的軟體。


RFSim99 軟體介紹

Step 1: 輸入 ZL (load impedance)

RFSim99 的 GUI 使用起來相當容易。可以選擇用 1-port 或 2-port 元件來輸入 load impedance。我們載入一個內建的 2-port 例子且設定頻率從 400MHz 到 800MHz (UHF band)。剛好非常類似一個 dipole antenna 如下圖。600MHz 的阻抗為 84.8-125.1j Ohm ,和前面 Smith 的例子一致。

S11 of 2-port


Step 2: L-match with HPF 和 LPF

RFSim99 已經把 L-match 自動加在軟體中。只要選 Auto Match,同時勾選 port-1 match 和 LPF (HPF) ,就可以自動產生正確的 L-match 電路。

L-match RFSim99

上圖是用 HPF 的結果,可以看到 L 和 C 值和圖四一致。S11 可以看到 600MHz 有一個很深的 notch。同時 S21 也呈現 HPF 的形狀。下圖是 Smith chart 的結果。除了在 600MHz 附近 match 不錯,大部份的頻率都不好,所以這是窄頻的 match。 L-match 的 LPF 也有一樣的問題。

smith chart


Step 3: Pi-match 和 T-match with BPF

接下來是 T-match。不過 RFSim99 沒有 T-match 或 pi-match 的自動 matching 功能。因此,我們必須用圖六或圖七所得到的結果。先看 LPF 的 T-match。

T-match S11

結果好很多,從 440MHz 到 800MHz S11 基本上都在 -10dB 以下。看 Smith chart 更明顯。


T-match smith chart


接下來是 BPF 的 T-match。結果更好,低頻甚至可以到 -20dB 以下。同時 Smith chart 也十分不錯。

T-match BPF S11


t-match BPF smith chart


附記

Ludwig 的 "RF Circuit Design" 其中有一章專門討論 impedance matching,是我看過 RF 書中最詳細的。

可以把 impedance matching 化簡問題為 R != 50Ohm to 50Ohm matching。是否有其他 optimal matching (e.g. constant Q, etc.)

2009年9月19日 星期六

Kalman Filter 簡介

Kalman 濾波器的部份,我發現網路上有一些不錯的介紹 (無法找到原作者 ),應用一引用其一。

在學習 Kalman 濾波器之前,首先看看為什麼叫「Kalman」。跟其他著名的理論(例如傅立葉變換,泰勒級數等等)一樣,Kalman也是一個人的名字,不同的是,他是個二十世紀的人。

Kalman 全名 Rudolf Emil Kalman,匈牙利數學家,1930年出生於匈牙利首都布達佩斯。1953,1954年於麻省理工學院分別獲得電機工程學士及碩士學位。1957年於哥倫比亞大學獲得博士學位。我們現在要學習的Kalman濾波器,正是源於他的博士論文和1960年發表的論文《A New Approach to Linear Filtering and Prediction Problems》(線性濾波與預測問題的新方法)。如果對這編論文有興趣,可以到這裡的地址下載: http://www.cs.unc.edu/~welch/kalman/media/pdf/Kalman1960.pdf

故名思義,Kalman 濾波器有兩類應用:一類是濾波 (filtering, 或稱為 smoothing),另一類是預測 (prediction)。特別後者被廣泛用在需要預測+修正 (prediction + correction) 的場合。簡單來說,Kalman濾波器是一個「optimal recursive data processing algorithm(最佳化自回歸數據處理演算法)」。對於解決很大部分的問題,他是最優,效率最高甚至是最有用的。他的廣泛應用已經超過30年,包括機器人導航,控制,傳感器數據融合甚至在軍事方面的雷達系統以及導彈追蹤等等。近年來更被應用於計算機圖像處理,例如頭臉識別,圖像分割,圖像邊緣檢測等等。

Kalman濾波器的介紹

為了可以更加容易的理解Kalman濾波器,這裡會用定性的描述方法來解釋,而不是像大多數參考書那樣羅列一大堆的數學公式和數學符號。雖然 Kalman filter 的5條公式是其核心內容,非常適合電腦執行。其實 Kalman 的程序相當的簡單,只要你理解了他的那5條公式。 在介紹他的5條公式之前,先讓我們來根據下面的例子一步一步的探索。

假設我們要研究的對象是一個房間的溫度。根據你的經驗判斷,這個房間的溫度是恆定的,也就是下一分鐘的溫度等於現在這一分鐘的溫度(假設我們用一分鐘來做時間單位)。假設你對你的經驗不是100%的相信,可能會有上下偏差幾度。我們把這些偏差看成是高斯白噪聲(White Gaussian Noise),也就是這些偏差跟前後時間是沒有關係的而且符合高斯分配(Gaussian Distribution)。另外,我們在房間裡放一個溫度計,但是這個溫度計也不準確的,測量值會比實際值偏差。我們也把這些偏差看成是高斯白噪聲。

好了,現在對於某一分鐘我們有兩個有關於該房間的溫度值:你根據經驗的預測值(系統的預測值)和溫度計的值(測量值)。下面我們要用這兩個值結合他們各自的噪聲來估算出房間的實際溫度值。

假如我們要估算k時刻的是實際溫度值。首先你要根據k-1時刻的溫度值,來預測k時刻的溫度。因為你相信溫度是恆定的,所以你會得到k時刻的溫度預測值是跟 k-1時刻一樣的,假設是23度,同時該值的高斯噪聲的偏差是5度(5是這樣得到的:如果k-1時刻估算出的最優溫度值的偏差是3,你對自己預測的不確定度是4度,他們平方相加再開方,就是5)(Step 1 and 2, state and covariance prediction)。然後,你從溫度計那裡得到了k時刻的溫度值,假設是25度,同時該值的偏差是4度。

由於我們用於估算k時刻的實際溫度有兩個溫度值,分別是23度和25度。究竟實際溫度是多少呢?相信自己還是相信溫度計呢?究竟相信誰多一點,我們可以用他們的 covariance來判斷。因為Kg^2=5^2/(5^2+4^2),所以Kg=0.78 (Step 4, Kalman gain correction),我們可以估算出k時刻的實際溫度值是:23+0.78* (25-23)=24.56度 (Step 3, state correction)。可以看出,因為溫度計的covariance比較小(比較相信溫度計),所以估算出的最優溫度值偏向溫度計的值。

現在我們已經得到k時刻的最優溫度值了,下一步就是要進入k+1時刻,進行新的最優估算。到現在為止,好像還沒看到什麼自回歸的東西出現。對了,在進入 k+1時刻之前,我們還要算出k時刻那個最優值(24.56度)的偏差。算法如下:((1-Kg)*5^2)^0.5=2.35 (Step 5, covariance correction)。這裡的5就是上面的k時刻你預測的那個23度溫度值的偏差,得出的2.35就是進入k+1時刻以後k時刻估算出的最優溫度值的偏差(對應於上面的3)。

就是這樣,Kalman濾波器就不斷的把covariance遞歸,從而估算出最優的溫度值。他運行的很快,而且它只保留了上一時刻的covariance。上面的Kg,就是Kalman增益(Kalman Gain)。他可以隨不同的時刻而改變他自己的值,是不是很神奇!

下面就要言歸正傳,討論真正工程系統上的Kalman。

Kalman濾波器演算法

在這一部分,我們就來描述源於 Dr Kalman 的Kalman濾波器。下面的描述,會涉及一些基本的概念知識,包括機率(Probability),隨機變量(Random Variable),高斯或常態分配(Gaussian Distribution)還有State-space Model等等。但對於Kalman濾波器的詳細證明,這裡不能一一描述。

首先,我們先要引入一個離散控制過程的系統。該系統可用一個線性隨機微分方程(Linear Stochastic Difference equation)來描述:
X(k)=A X(k-1)+B U(k)+W(k)

再加上系統的測量值:
Z(k)=H X(k)+V(k)

上兩式子中,X(k)是k時刻的系統狀態,U(k)是k時刻對系統的控制量。A和B是系統參數,對於多模型系統,他們為矩陣。Z(k)是k時刻的測量值,H 是測量系統的參數,對於多測量系統,H為矩陣。W(k)和V(k)分別表示過程和測量的噪聲。他們被假設成高斯白噪聲(White Gaussian Noise),他們的covariance 分別是Q,R(這裡我們假設他們不隨系統狀態變化而變化)。

對於滿足上面的條件(線性隨機微分系統,過程和測量都是高斯白噪聲),Kalman濾波器是最佳的信息處理器。下面我們來用他們結合他們的covariances 來估算系統的最佳化輸出(類似上一節那個溫度的例子)。

首先我們要利用系統的過程模型,來預測下一狀態的系統。假設現在的系統狀態是k,根據系統的模型,可以基於系統的上一狀態而預測出現在狀態:
X(k|k-1)=A X(k-1|k-1)+B U(k) ……….. (1)
式(1)中,X(k|k-1)是利用上一狀態預測的結果,X(k-1|k-1)是上一狀態最佳的結果,U(k)為現在狀態的控制量,如果沒有控制量,它可以為0。
到現在為止,我們的系統結果已經更新了,可是,對應於X(k|k-1)的covariance還沒更新。我們用P表示covariance:
P(k|k-1)=A P(k-1|k-1) A'+Q ……… (2)
式 (2)中,P(k|k-1)是X(k|k-1)對應的covariance,P(k-1|k-1)是X(k-1|k-1)對應的 covariance,A'表示A的轉置矩陣,Q是系統過程的covariance。式子1,2就是Kalman濾波器5個公式當中的前兩個,也就是對系統的預測。
現在我們有了現在狀態的預測結果,然後我們再收集現在狀態的測量值。結合預測值和測量值,我們可以得到現在狀態(k)的最優化估算值X(k|k):
X(k|k)= X(k|k-1)+Kg(k) (Z(k)-H X(k|k-1)) ……… (3)
其中Kg為Kalman增益(Kalman Gain):
Kg(k)= P(k|k-1) H' / (H P(k|k-1) H' + R) ……… (4)
到現在為止,我們已經得到了k狀態下最優的估算值X(k|k)。但是為了要另Kalman濾波器不斷的運行下去直到系統過程結束,我們還要更新k狀態下X(k|k)的covariance:
P(k|k)=(I-Kg(k) H)P(k|k-1) ……… (5)
其中I 為1的矩陣,對於單模型單測量,I=1。當系統進入k+1狀態時,P(k|k)就是式子(2)的P(k-1|k-1)。這樣,算法就可以自回歸的運算下去。
Kalman濾波器的原理基本描述了,式子1,2,3,4和5就是他的5 個基本公式。根據這5個公式,可以很容易的實現計算機的程序。
下面,我會用程序舉一個實際運行的例子。。。 
 

應用一: 找出 (estimate) 室溫

這裡我們舉一個非常簡單的例子來說明 Kalman 濾波器的工作過程。所舉的例子是進一步描述上一節的例子,而且還會配以 matlab 模擬結果。

根據第二節的描述,把房間看成一個系統,然後對這個系統建模。當然,我們見的模型不需要非常地精確。我們所知道的這個房間的溫度是跟前一時刻的溫度相同的,所以A=1。沒有控制量,所以U(k)=0。因此得出:

X(k|k-1)=X(k-1|k-1) ……….. (6)

式子(2)可以改成:

P(k|k-1)=P(k-1|k-1) +Q ……… (7)

因為測量的值是溫度計的,跟溫度直接對應,所以H=1。式子3,4,5可以改成以下:

X(k|k)= X(k|k-1)+Kg(k) (Z(k)-X(k|k-1)) ……… (8)

Kg(k)= P(k|k-1) / (P(k|k-1) + R) ……… (9)

P(k|k)=(1-Kg(k))P(k|k-1) ……… (10)

現在我們模擬一組測量值作為輸入。假設房間的真實溫度為25度,我模擬了200個測量值,這些測量值的平均值為25度,但是加入了標準偏差為幾度的高斯白噪聲(在圖中為藍線)。

為了令Kalman濾波器開始工作,我們需要告訴Kalman兩個零時刻的初始值,是X(0|0)和P(0|0)。他們的值不用太在意,隨便給一個就可以了,因為隨著Kalman的工作,X會逐漸的收斂。但是對於P,一般不要取0,因為這樣可能會令Kalman完全相信你給定的X(0|0)是系統最優的,從而使算法不能收斂。我選了 X(0|0)=1度,P(0|0)=10。

該系統的真實溫度為25度,圖中用黑線表示。圖中紅線是Kalman濾波器輸出的最優化結果(該結果在算法中設置了Q=1e-6,R=1e-1)。


附matlab下面的kalman濾波程序:

clear

N=200;

w(1)=0;

w=randn(1,N)

x(1)=0;

a=1;

for k=2:N;

x(k)=a*x(k-1)+w(k-1);

end

V=randn(1,N);

q1=std(V);

Rvv=q1.^2;

q2=std(x);

Rxx=q2.^2;

q3=std(w);

Rww=q3.^2;

c=0.2;

Y=c*x+V;

p(1)=0;

s(1)=0;

for t=2:N;

p1(t)=a.^2*p(t-1)+Rww;

b(t)=c*p1(t)/(c.^2*p1(t)+Rvv);

s(t)=a*s(t-1)+b(t)*(Y(t)-a*c*s(t-1));

p(t)=p1(t)-c*b(t)*p1(t);

end

t=1:N;

plot(t,s,'r',t,Y,'g',t,x,'b');


 應用二:Symbol(Bit) Synchronization with Unknown Phase/Frequency

考慮如下一個 burst mode 的 packet (任何 shared media 的傳送方式)。在 packet 最前頭都會有 1010.. 的 preamble 做為 bit/symbol synchronization。緊接在後的是事先定義好的 frame sync word 用來做為確認 lock 到對的 packet 以及 word boundary。最後才是實際的 data。這個應用 focus 在 preamble 部份 (1010..) synchronization,也就是找出 (estimate) preamble 的相位和頻率,同步之後的 data。

image 

我們可以把問題重新定義如下:A [2pft + q]  如何找出 f (or b = 1/(2pf) or T=1/f) and q ?

這個問題同樣可以用 state-space model 來模擬,而得到最佳的 Kalman filter 解。有趣的是,Kalman filter 等價於一個 2nd order time variant PLL 架構。這和一般所用 2nd order time invariant PLL 非常近似。可參見另文 Kalman Filter and PLL。

應用三:TCP/IP 演算法和 Kalman Filter

2009年4月25日 星期六

LDO Regulator 簡介

img003

LDO (Low Dropout Regulator) 的主要功能就是在輸入電壓 (Vin) 或是輸出電流 (Iout) 變動的情形下,仍然維持穩定的輸出電壓 (Vout)。如上圖所示,如果 Vin (就是 line) 有一個電壓的突升, 輸出電壓 Vout 也會隨之改變,但經由 LDO 的回授電路會把 Vout 穩定在原來的電壓,因此 Vout 有一些電壓漣波,同時最終穩定的電壓也有些許的變化。Vout 對 Vin 的變化稱之為 line regulation,後面有更詳細的說明。同樣的如果輸出電流突升,輸出電壓 Vout 也會改變, Vout 對 Iout 的變化則稱為 load regulation。

 img007

上圖是一個 LDO 的原理圖,主要有四個部份。簡單卻包含了類比電路的feedback 控制、和補償的原理。

Reference 和 RC filter: 通常為 bandgap 電路加上 RC 濾波電路提供穩定的參考電壓。

Error Amplifier 及 R1/R2 分壓: 通常為一簡單的 opamp 放大輸出電壓(經R1/R2 比例)和參考電壓的誤差。注意此處參考電壓接正極。實務上 Pass FET 多為 PMOS 提供多一次反向。因此參考電壓會接負極而非正極。

Pass FET: 一般為一個巨大的 PMOS。PMOS 的大小由提供的電流和 dropout voltage 決定。

Cout 及 Rload: Cout 為輸出濾波及提供快速電流給 output load。可以用 Rload 模擬 LDO 提供的電流。 Cout 通常會有寄生電感和電阻,稱之為 ESL 和 ESR (equivlaent serial resistance)。其中 ESR 對於 LDO 的穩定(或振盪)相當重要。


LDO performance: AC and Step Response

LDO 常見的特性包含 frequency domain PSRR 和 time domain step response。以 Vin 的 PSRR 為例:

 image

上圖為 Vout 對 Vin 在不同頻率正弦波的 rejection ratio 。一般可分為三區:

  • Region 1 是由 reference 和 RC filter 決定。由於 RC 面積的限制,一般 RC filter 的頻率很難低於100 Hz。
  • Region 2 是由全部的 feedback loop 的 gain 和 frequency response 決定,包含 error amp, pass FET, output load 和 R1/R2。一般 dominant pole 是由 Cout Rload 決定 (10uF, 10 Ohm ~  1.5kHz)。
  • Region 3 是由 output 電容分壓決定。Cout 愈大,PSRR 在 region 3 愈高。


再以 load current 的 500mA step response 為例:

 Screenshot - 20090511 - 002144

可分為二區

第一區為高頻區 (以 close loop 的 loop bandwidth 為準)。因為 error amplifier 和 PMOS 來不及反應,電流由外接電容供應,因此 Vout 往下降。可以根據 output cap 以及寄生的電阻電感、再細分為三個部份壓降,分別為 ESR, 其次為 ESL, 然後是 cap 造成。ESL 壓降最快,反應電流的變率(微分);ESR 壓降其次,直接反應電流; cap 壓降最慢,反應電流的積分 (droop)。

一旦進入了 loop bandwidth 的反應時間,error amplifier 和 PMOS 開始動作,加大的電流同時供應 output load 以及對電容充電。電壓上升,這時對應的是 PSRR 的 region II 。

理論上可以同樣得出 Vin  的 step response 和 load current 的 ac response。可由 fourier transform 得到。不過一般 LDO 較少用到。

  AC response Step response
Input Voltage PSRR, 週期性 noise step noise
Load current 很少用到 常見且重要


LDO Frequency Compensation

Screenshot - 20090516 - 012513

上述的 LDO 很明顯有 stability 的問題,因為有兩個低頻的 poles:一個位於 output 的 dominant pole,由 Cload (~10uF) 所造成;另一個位於 PMOS  gate 的 non-dominant pole,由 PMOS 的 gate capacitance (Cgate ~ 幾十 pF) 所造成。另外加上一些高頻的 poles, 會讓 phase margin 小於10度而引起 stability 的問題。

更麻煩的是 Cload 所看到的等效電阻會隨著 Iload 有很大的改變。大電流時 (50-100mA) 等效電阻小 (Rload 和Rpar, 幾十歐姆),小電流時 (<1mA) 時等效電阻大 (> kOhm)。會造成 dominant pole 頻率可能相差百倍。

相反的,Cgate 所看到的等效電阻 (error amplifier output impedance) 卻是與 Iload 無關,non-dominant pole 的頻率基本上不會隨著 Iload 改變 (但仍與 PVT 有關)。因些有可能藉著增加 zero 來補償 (或者可想成 cancel) non-dominant pole 而增加 phase margin。


Screenshot - 20090516 - 084339

最容易加上 zero 的方法就是直接利用 output cap 上的 ESR,自動創造出一個位於 Cload* ESR 的 zero。這個增加 zero 的方法簡單有效,廣為 LDO 所用,但是有一些限制。

  1. 為了能適當的補償或 cancel non-dominant pole,ESR 值有一定的範圍,太大或太小都會造成問題。
  2. 必須選擇 tantalum (鉭質)電容,因為 ESR 值適中 (~100 mOhm) 且不隨著溫度變化太大。ceramic 電容雖然體積小且低價,但 ESR 過小 (<10 mOhm) 不適合。一般電解電容的 ESR 隨溫度變化太大也不適合。
  3. 另外 ESR 在 Iload 變化時,會有額外的壓降而造成 Vout 上的 noise。

對於 LDO 更詳細的介紹請參考 LDO 設計重點一文。

2009年1月16日 星期五

Smith Chart

Introduction

img012

Maxwell published his famous equations governing all electrical and electronic phenomenon (with some quantum mechanics in some cases) in 1873.  There are two problems.  First, the math of solving the Maxwell equation consists of vector analysis and partial differential equation.  It is too cubersome to derive the solution of a particular problem.

It seems that there is a dilemma to get a full picture of a simple dipole antenna.  Solving Maxwell equations provides the accurate solution, but loses the physical intuition and not practical due to the computation complexity. 

Lumped circuit model provides a simple approximation of a dipole antenna, it is useful but only valid within limited frequency range.  The situation is shown in Fig. 6.

img011

Fig. 6: Different abstraction in electrical discipline

Luckily, there is a another tool originally derived from transmission line, namely Smith Chart, provides useful physical insight and enough accuracy for understanding the dipole antenna.  A brief introduction of Smith Chart is on the other article.  Lumped circuit is a subset included in Smith Chart.  Smith Chart (transmission line) is based on a specific EM wave called TEM (transverse EM) wave where the dynamic electrical and magnetic fields are perpendicular to the wave propagation direction.  The majority of EM wave and waveguide either belong to the TEM domain or can be approximated by TEM wave.  That is, Smith Chart is a very useful tool to solve most electrical problems.


The Smith Chart is plotted on the complex reflection coefficient plane in two dimensions and is scaled in normalized impedance (the most common), normalized admittance or both.  Normalized scaling allows the Smith Chart to be used for problems involving any characteristic impedance or system impedance, although by far the most commonly used is 50 Ohm.  With relatively simple graphical construction it is straightforward to convert between normalized impedance and the corresponding complex voltage reflection coefficient.  Please refer wiki's Smart Chart for details and this reference.

How Smith Chart Work?

The keys are complex reflection coefficient, G, and normalized impedance, z, are plotted on the same chart as shown in Figure 1. 

  • The red x-y aisles represents the real and imaginary part of G.  The intersecting point is the origin of the Smith Chart.  Because |G| <= 1, the Smith Chart is fit inside a unit circle.  The Smith Chart is not suitable for active circuit where the reflection coefficient might be larger than 1.     
  • The green circles represent zr = constant (zr is the real part of normalized impedance).  The constant must be positive.  The largest circle corresponds to zr=0 and also |G|=1.  As zr increases to infinity, the circle converges to a point G=1 that is a open load.   
  • The black circles represents zi = constant (zi the imaginary part of normalized impedance).  The constant can be positive/inductive, circles on the upper plane; or negative/capacitive,  circles on the lower plane.  The largest circle, x-axis,  corresponds to zi=0.  As zi increases to both positive/negative infinity, the circles also converges to a point G=1 that is a open load.     

image 

Fig. 1: Smith Chart Fundamental
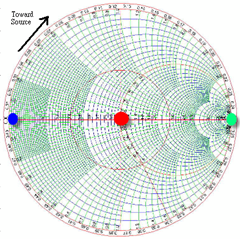
smith chart 

Fig. 2: Smith Chart

  • The red-dot in Fig. 2 corresponds to no reflection (50Ohm load, G=0) ; the blue-dot corresponds to short load (G=-1); the green-dot corresponds to open load (G=1).  The open load and short load is mirrored to each other through l/4 transformation as discussed in the next section.
Example:

Assume the characteristic impedance is 50Ω :

Z1 = 100 + j50Ω    Z2 = 75 - j100Ω    Z3 = j200Ω
Z4 = 150Ω  Z5 = ∞ (open)   Z6 = 0 (short)
Z7 = 50Ω   Z8 = 184 - j900Ω

smith chart3 

Fig. 3: Some Example Impedance

Note that a dipole antenna is close to open (Z5) at DC and becomes capacitive at lower frequency (Z8).  If it is well matched at operating frequency, the impedance is close to 50Ohm (Z7); that is: Z5->Z8->Z2->Z7.  Practically, the trajectory may be similar to the purple area because of non-perfect matching.


Transmission Line on Smith Chart

image 

Fig. 4: Input Impedance with Transmission Line

One key advantage of Smith Chart is to obtain the input impedance of a load with transmission line shown in the above figure. 

  • For a lossless transmission line, the input impedance toward source is simply a clockwise rotation of the load impedance on the Smith Chart shown in Fig. 2.  To remember clockwise rotation is to observe open load (green-dot) turns to capacitive (negative) load first; or short load (blue-dot) turns to inductive (positive) load first.
  • One full circle rotation on Smith Chart represents half-wavelength (l/2) transmission line length; half circle rotation represents l/4 line length.  Remember the famous quarter wavelength impedance transformation.  From open to short is half circle rotation, corresponds to l/4 transmission line length.  For any load after the l/4 transformation, the input impedance becomes the mirror point (with origin) on the Smith Chart.

Even though the Smith Chart is developed for system with transmission line, it is also very useful in lumped circuit for matching and analysis purpose in RF IC design  shown in next sections.


Admittance Smith Chart

The Smith chart is built by considering impedance (resistor and reactance).  Once the Smith chart is built, it can be used to analyze these parameters in both the series and parallel worlds.  Adding elements in a series is straightforward.  New elements can be added and their effects determined by simply moving along the circle to their respective values.  However, summing elements in parallel is another matter.  This requires considering additional parameters.  Often it is easier to work with parallel elements in the admittance world.

It turns out that the expression for y is the opposite, in sign, of z, and Γ(y) = -Γ(z).  If we know z, we can invert the signs of Γ and find a mirror point situated in the opposite direction.   Thus, an admittance Smith chart can be obtained by rotating the whole impedance Smith chart by 180°.  This is extremely convenient, as it eliminates the necessity of building another chart.  The intersecting point of all the circles (constant conductance and constant susceptances) is at the point (-1, 0) automatically.  With that plot, adding elements in parallel also becomes easier.  Math details can refer to this.


Lumped Elements on Smith Chart

When solving problems where elements in series and in parallel are mixed together, we can use the same Smith chart and rotate it around any point where conversions from z to y or y to z exist. 

Let's consider the network of Fig. 5 (the elements are normalized with Z0 = 50Ω).  The series reactance (x) is positive for inductance and negative for capacitance. The susceptance (b) is positive for capacitance and negative for inductance.

image 

Fig. 5: Input Impedance of Lumped Elements

The circuit needs to be simplified (see Fig. 6).  Starting at the right side, where there is a resistor and an inductor with a value of 1, we plot a series point where the r circle = 1 and the l circle = 1.  This becomes point A.  As the next element is an element in shunt (parallel), we switch to the admittance Smith chart (by rotating the whole plane 180°).  To do this, however, we need to convert the previous point into admittance.  This becomes A'.  We then rotate the plane by 180°.  We are now in the admittance mode.  The shunt element can be added by going along the conductance circle by a distance corresponding to 0.3.  This must be done in a counterclockwise direction (negative value) and gives point B.  Fig. 7 shows the complete impedance transformation using Smith Chart.

image

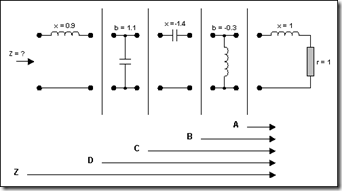
Fig. 6: Break the Network for Analysis

image

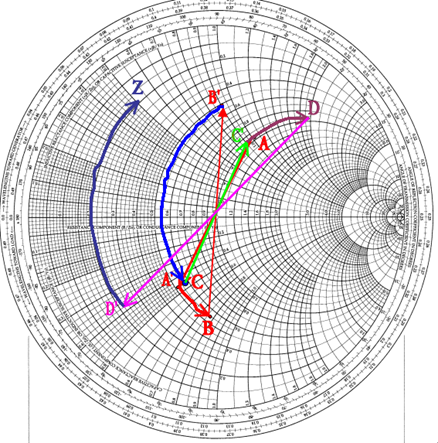
Fig. 7: Impedance Using Smith Chart


In summary

1. Add a serial L:

Move up (clockwise) along  r=constant circle (circles intersects at (1,0))

2. Add a shunt L:

Move up (counter-clock) along g=constant circle (circles intersects at (-1,0))

3. Add a serial C:

Move down (counterclockwise) along r=constant circle (circles intersects at (1,0))

4. Add a shunt C:

Move  down (clockwise) along g=constant circle (circles intersects at (-1,0))

The following figure shows the summary.

image 


How to do matching using Smith Chart

L-match (8 types)

The following figure shows 4 different type of L match for positive reactance matching


image


Similarly, there are 4 types for negative reactance just exchange L and C.

pi/T-match

image


There are above 8 types of pi/T matching.  Similarly, the mirror from positive to negative is to change L and C.


Examples

(I) Impedance Transformation from Tom Lee's RF CMOS book.

* If ZL is a pure resistance and ZL > Zo; only type2 (shunt-C with serial-L, or shunt-L with serial C) can convert Zin < ZL and Zin = ZL / ??  (only at resonant frequency, normally is a LPF or  HPF)

* If ZL is a pure resistance and ZL < Zo; only type 4 (serial-C with shunt-L, or  serial C with shunt C) can convert Zin > ZL and Zin = ?? (only at resonant frequency, normally is a HPF)

The above two L matches are in Tom Lee's book.

(II)

For dipole antenna below resonating frequency, it is like a serial RLC resonator; the resistor is higher than 50Ohm (air is 270Ohm); typical may be  75Ohm.  The resonating  frequency is assumed to be higher than the desired frequency.   (Example, the LC frequency maybe 1GHz, but the operating frequency is 600MHz, etc.) 

Therefore, the impedance is  75+X j Ohm (X is -200 to -50 Ohm).  Is it possible to design a matching network? 

Before/after resonating frequency

Condition 1: Re > 50Ohm and Im < 0 (capacitive load with high real impedance): example: dipole antenna before resonator

Condition 2: Re < 50Ohm and Im > 0 (inductive load and low real impedance): example: loop antenna

Condition 3: Re > 50Ohm and Im > 0 (inductive load with high real impedance??): example: dipole antenna after the resonator?

Condition 4: Re < 50Ohm and Im < 0 (capacitive load with low real impedance??): example: loop antenna

The matching choice (a) serial inductor; (b) parallel inductor.  Both reduce the reactive part.  The problem of (a) is real part is not change.  Therefore choose (b) to reduce R from 72 to 50.  Then use a serial capacitor to bring to the right matching point!!!

The best way to do is to use the center frequency first, not considering the entire frequency range.  E.g. 400M to 800M, maybe use 600M for the matching purpose!!

Examine the L and Pi match

Impedance Matching with Smart Chart

http://www.maxim-ic.com/appnotes.cfm/an_pk/742/

  • Match for maximum power transfer or optimize the noise figure or highest gain?  Highest gain is always lowest noise figure?
  • Maximum power transfer => Rs = RL*
  • ?Ensure quality factor impact or access stability analysis because the matching network can be LPF or HPF or BPF.
  • ? Can we replace RLC with scattering wave analysis using smith chart for both passive and active component (cmos?)  there is no concept of impedance at low frequency? wrong, can I still normalize to 50Ohm since there is still finite value of impedance?

追蹤者