從上次的 Group Theory - 我的經驗 之後。很少花時間在 group, 因此又忘的差不多。
這次看了結城浩的數學女孩 x 伽羅瓦理論,非常驚艷於其中非常清楚而且淺顯的內容介紹 group theory. 如何從解方程式 (2, 3, 4, 5 次元) 體 (field) 的問題,轉化為 group 問題。以及 Gaolois 的論文清楚解說。Bonus 是順便解釋 Greek 作圖的三等分角問題。
本文摘錄其中的重點。
從上次的 Group Theory - 我的經驗 之後。很少花時間在 group, 因此又忘的差不多。
這次看了結城浩的數學女孩 x 伽羅瓦理論,非常驚艷於其中非常清楚而且淺顯的內容介紹 group theory. 如何從解方程式 (2, 3, 4, 5 次元) 體 (field) 的問題,轉化為 group 問題。以及 Gaolois 的論文清楚解說。Bonus 是順便解釋 Greek 作圖的三等分角問題。
本文摘錄其中的重點。
本文主要參考 Marc 的 OpenCV 筆記
OpenCV 主要 support C++ 和 Python 兩種 interfaces.
之前主要以 python 為主。不過在某些情況 C++ 的 computation efficiency 有優勢。
因此熟悉基本操作仍有需要。
OpenCV 最重要的 data format 是 (2-D) matrix. 因為這是多數影像的型態。
Mat image(240, 320, CV_8UC3);
image size 是 240x320. 格式是 CV_8UC3 -> CV_<bit-depth> {U|S|F}C(<number of channels>)
U 是 unsigned integer type, S 是 signed integer type, and F 是 float type.
所以 8UC3 就是 8bit, unsigned integer, 3 channels (e.g. RGB or actually BGR image).
image.create(480, 640, CV_8UC3);
Mat A33(3, 3, CV_32F, Scalar(5));
另一種方式是用 ones matrix
Mat B33 = Mat::ones(3, 3, CV_32F)*5.;
或是用 zeros matrix
Mat C33 = Mat::zeros(3, 3, CV_32F) + 5.;
以上的方法似乎只用於 1 channel case.
如果宣告 3 channels. 只有 channel 1 有初始值。
如果要 3 channels 都有初始值。可以用以下的方法:
Mat img1(5, 5, CV_8UC1, Scalar(9) );
Mat dst;
cvtColor(img1, dst, CV_GRAY2RGB);
此是 dst 會是 CV_8UC3 且初始化為 9.
Mat A22 = Mat_<float>(2,2) << 5, -15, 20, -15);
或是
float B22data[] = { 5, -15, 20, -15};
Mat B22 = Mat(2, 2, CV_32F, B22data).clone();
註: 用 clone 會複製到新的 memory.
如果不用 clone 也可以。但變成 pointer 而非 memory copy.
如果 B22data 改變,也會改變 B22.
cv::Mat 轉換成 cv::Mat
Mat image_alias = image
將一般陣列轉換成 cv::Mat
float* Idata = new float[480*640*3];
Mat I(480, 640, CV_32FC3, Idata);
將vector陣列轉換成cv::Mat
vector<Point> iptvec(10); Mat dstMat(iptvec); 將IplImage轉換成cv::Mat
IplImage* iMG = cvCreateImage(cvSize(320,240), 16, 1); Mat dstMat = cvarrToMat(iMG);將cv::Mat轉換成IplImage
Mat srcMat; IplImage iMG = srcMat; 將cv::Mat轉換成CvMat
Mat srcMat; CvMat dstCvMat = srcMat;將IplImage複製給cv::Mat
IplImage* iMG = cvCreateImage(cvSize(320,240), 16, 1); Mat dstMat = cvarrToMat(iMG).clone();將cv::Mat複製給vector
Mat srcMat; vector<Point2f> ptvec = Mat_<Point2f>(srcMat);
cv::Mat 合併、插入、移除cv::Mat hMat(5,1,CV_8UC1,cv::Scalar(2)); cv::Mat sMat(5,1,CV_8UC1,cv::Scalar(5)); cv::Mat tmpMat(5,2, CV_8UC1 ); hMat.copyTo( tmpMat.col(0) ); sMat.copyTo( tmpMat.col(1) ); /* 25 25 25 25 25 */合併cv::Mat
cv::Mat mat1(1,3, CV_8UC1,cv::Scalar(2)); cv::Mat mat2(2,3, CV_8UC1,cv::Scalar(3)); cv::Mat matM; matM.push_back(mat1); matM.push_back(mat2); /* 222 333 333 */** CV_8UC1 to CV_32FC1
cv::Mat mat8U(3,2,CV_8UC1,cv::Scalar(2)); cv::Mat mat32F; mat8U.convertTo(mat32F, CV_32FC1);cv::Mat計算陣列中非0值的數量
cv::Mat src(5,3,CV_8UC1, cv::Scalar(3)); int total = cv::countNonZero(src); std::cout<<total; //15
Step1
> sudo apt-get infall octave
> sudo apt-get install octave-control octave-image octave-signal
本文主要參考 pyimagesearch
http://www.pyimagesearch.com/2015/10/26/how-to-install-opencv-3-on-raspbian-jessie/
OpenCV 目前是 de facto computer vision 的開放平台以及提供許多範例。
除了 kernel 是 C/C++ 提供高效率外,另外有多種 interface 如 python or matlab.
OpenCV 唯一比較麻煩的是沒有一鍵 installation, 或是 apt-get or rpm.
需要 download OpenCV source code 重新 compile.
如果要使用 python interface, Anaconda 沒有直接包含 OpenCV, 需要 conda install (menpo) reposite.
Enthought Canopy 是有包 OpenCV 2.4.9 (舊的版本). 如果要用最新的版本 (3.1.0 at 2016/5/11), 還是要自己 compile.
因為 OpenCV 仍然持續 evolve. 為了要得到最新版本,還是要知道如何 compile source code.
The first thing we should do is update and upgrade any existing packages, followed by updating the Raspberry Pi firmware.
Timing: 3m 33s
You’ll need to reboot your Raspberry Pi after the firmware update:
Now we need to install a few developer tools:
Timing: 51s
Now we can move on to installing image I/O packages which allow us to load image file formats such as JPEG, PNG, TIFF, etc.:
Timing: 42s
Just like we need image I/O packages, we also need video I/O packages. These packages allow us to load various video file formats as well as work with video streams:
Timing: 58s
We need to install the GTK development library so we can compile the highgui sub-module of OpenCV, which allows us to display images to our screen and build simple GUI interfaces:
Timing: 2m 48s
Various operations inside of OpenCV (such as matrix operations) can be optimized using added dependencies:
Timing: 50s
Lastly, we’ll need to install the Python 2.7 and Python 3 header files so we can compile our OpenCV + Python bindings:
At this point we have all of our prerequisites installed, so let’s grab the 3.1.0 version of OpenCV from the OpenCV repository. (Note: As future versions of OpenCV are released just replace the 3.1.0 with the most recent version number):
Timing: 2m 29s
For the full install of OpenCV 3 (which includes features such as SIFT and SURF), be sure to grab the opencv_contrib repo as well. (Note: Make sure your opencv and opencv_contrib versions match up, otherwise you will run into errors during compilation. For example, if I download v3.0.0 of opencv , then I’ll want to download v3.0.0 of opencv_contrib as well):
Timing: 1m 54s
The first step in setting up Python for our OpenCV compile is to install pip , a Python package manager:
Timing: 26s
I’ve discussed both virtualenv and virtualenvwrapper many times on the PyImageSearch blog before, especially within these installation tutorials. Installing these packages is certainly not a requirement to get OpenCV and Python up and running on your Raspberry Pi, but I highly recommend that you install them!
Using virtualenv and virtualenvwrapper allows you to create isolated Python environments, separate from your system install of Python. This means that you can run multiple versions of Python, with different versions of packages installed into each virtual environment — this solves the “Project A depends on version 1.x, but Project B needs 4.x” problem that often arises in software engineering.
Again, it’s standard practice in the Python community to use virtual environments, so I highly suggest that you start using them if you are not already:
Timing: 17s
After virtualenv and virtualenvwrapper have been installed, we need to update our~/.profile file and insert the following lines at the bottom of the file:
You can use your favorite editor to edit this file, such as vim , emacs , nano , or any other graphical editor included in the Raspbian Jessie distribution. Again, all you need to do is open the file located at /home/pi/.profile and insert the lines above at the bottom of the file.
Now that your ~/.profile has been updated, you need to reload it so the changes can take affect. To force a reload of the ~/.profile file you can (1) logout and log back in, (2) close your terminal and open up a new one, or (3) just use the source command:
Note: You’ll likely need to run the source ~/.profile command each time you open up a new terminal to ensure your environment has been setup correctly.
The next step is to create our Python virtual environment where we’ll be doing our computer vision work:
The above command will create a virtual environment named cv using Python 2.7.
If you want Python 3, run this command instead:
Again, it’s important to note that the cv Python environment is entirely independent from the default version of Python included in the download of Raspbian Jesse.
If you ever reboot your system, logout and log back in, or open up a new terminal, you’ll need to use the workon command to re-access the cv virtual environment, otherwise you’ll be using the system version of Python instead:
You can ensure you are in the cv virtual environment by examining your command line. If you see the text “(cv)” preceding your prompt, then you are in the cv virtual environment:
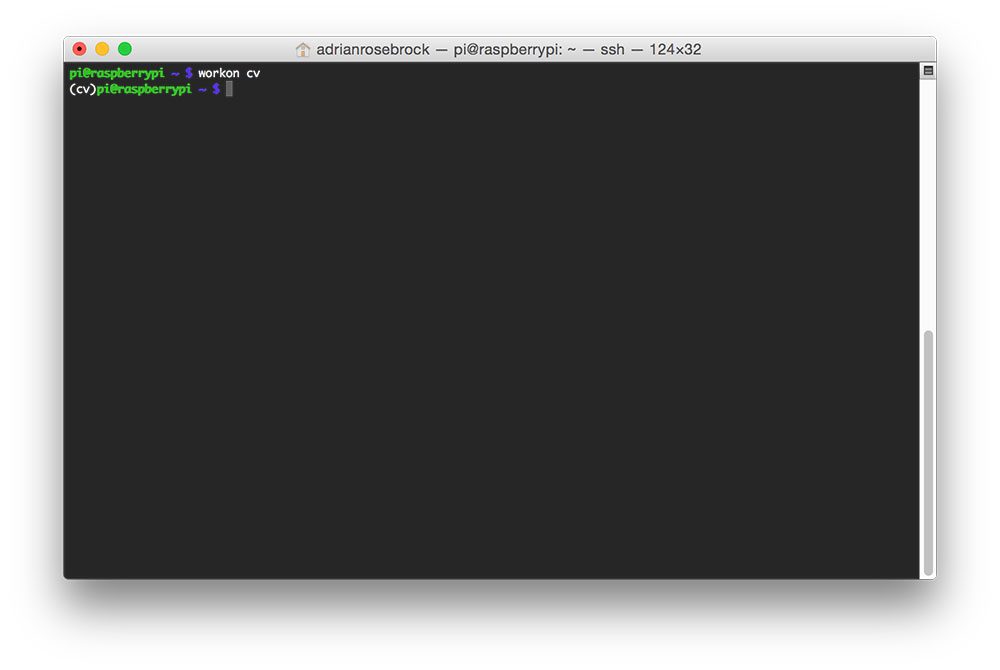
Figure 1: Make sure you see the “(cv)” text on your prompting, indicating that you are in the cv virtual environment.
Otherwise, you are not in the cv virtual environment:
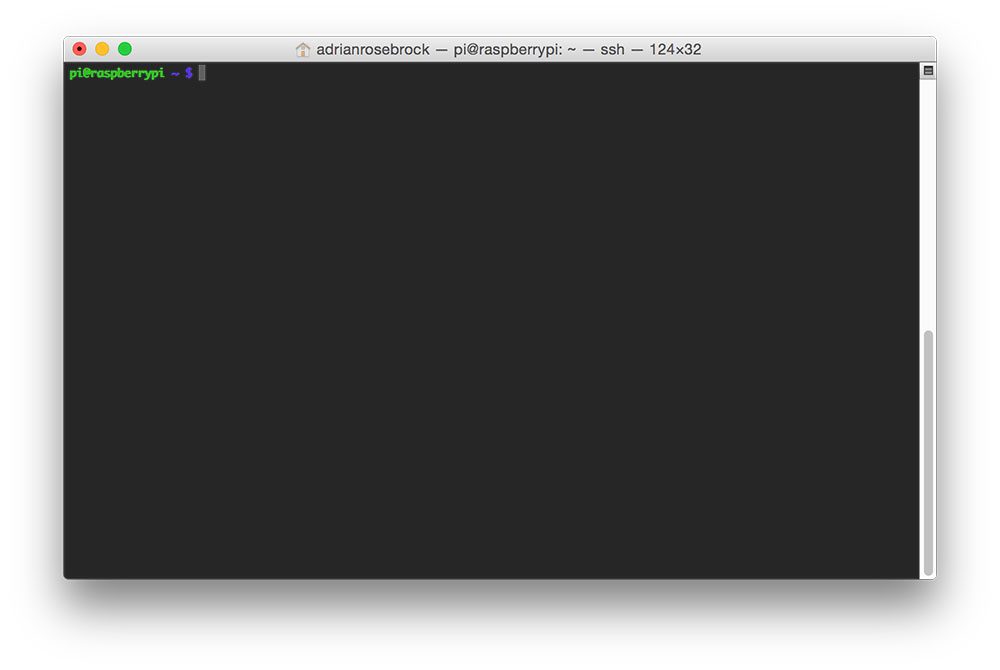
Figure 2: If you do not see the “(cv)” text on your prompt, then you are not in the cv virtual environment.
If this is the case, you need to run the source and workon commands above.
Assuming that you are in the cv virtual environment, we can install NumPy, an important dependency when compiling the Python bindings for OpenCV. You might want to grab a cup of coffee or go for a walk while NumPy downloads and installs:
Timing: 16m 10s
At this point, we are ready to compile OpenCV.
First, make sure you are in the cv virtual environment:
Followed by setting up the build:
Update (3 January 2016): In order to build OpenCV 3.1.0 , you need to set -DINSTALL_C_EXAMPLES=OFF (rather than ON ) in the cmake command. There is a bug in the OpenCV v3.1.0 CMake build script that can cause errors if you leave this switch on. Once you set this switch to off, CMake should run without a problem.
Before you move on to the compilation step, make sure you examine the output of CMake!
Scroll down the section titled Python 2 and Python 3 .
If you’re compiling OpenCV 3 for Python 2.7, then you’ll want to make sure the Python 2 section looks like this (highlighted) in red:
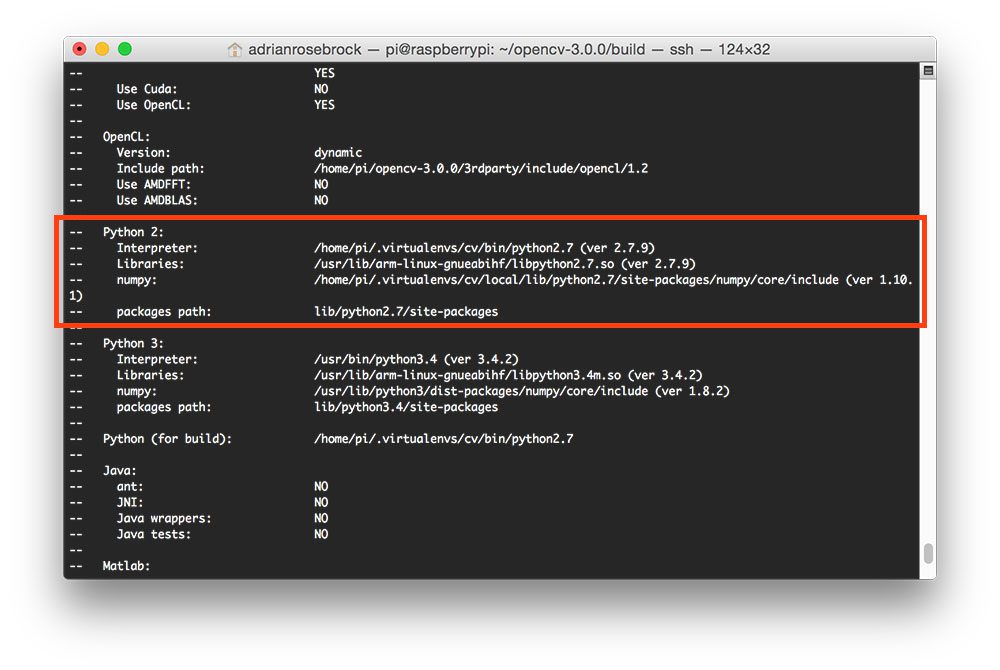
Figure 3: Ensuring that Python 2.7 will be used for the compile.
Notice how both the Interpreter and numpy variables point to the cv virtual environment.
Similarly, if you’re compiling OpenCV for Python 3, then make sure the Python 3 section looks like this:
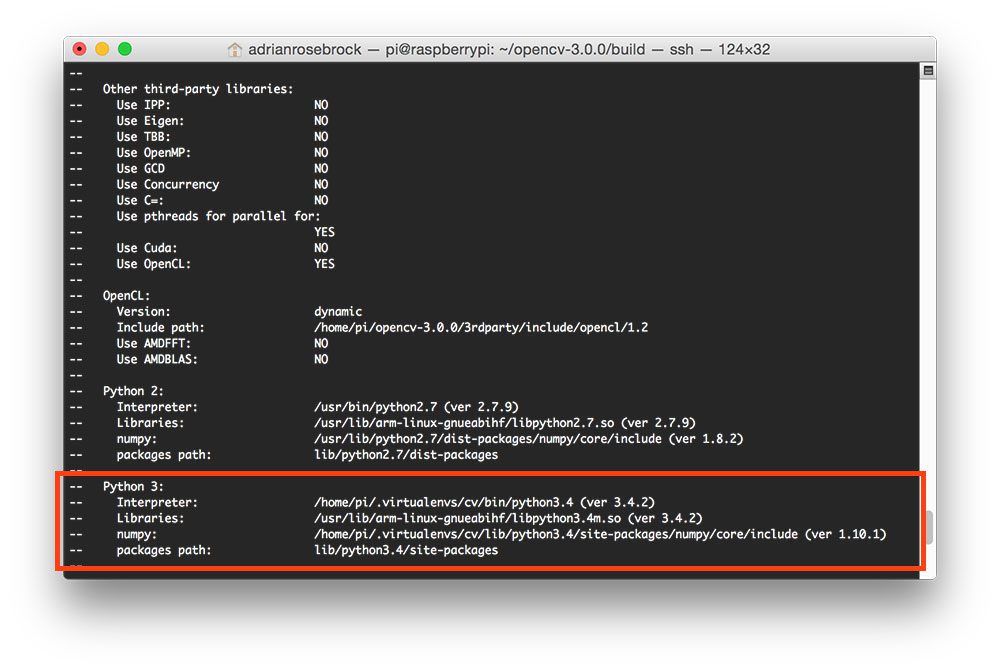
Figure 4: Ensuring that Python 3 will be used for the compile.
Again, both the Interpreter and numpy variables are pointing to our cv virtual environment.
In either case, if you do not see the cv virtual environment for these variables MAKE SURE YOU ARE IN THE cv VIRTUAL ENVIRONMENT PRIOR TO RUNNING CMAKE!
Now that our build is all setup, we can compile OpenCV:
Timing: 1h 35m
The -j4 switch stands for the number of cores to use when compiling OpenCV. Since we are using a Raspberry Pi 2, we’ll leverage all four cores of the processor for a faster compilation.
However, if your make command errors out, I would suggest starting the compilation over again and only using one core:
Using only one core will take much longer to compile, but can help reduce any type of strange race dependency condition errors when compiling.
Assuming OpenCV compiled without error, all we need to do is install it on our system:
We’re almost there! Just a few more things and we’ll be 100% done.
Provided you finished Step #4 without error, OpenCV should now be installed in/usr/local/lib/python2.7/site-packages :
Note: In some instances OpenCV can be installed in /usr/local/lib/python2.7/dist-packages (note the dist-packages rather than site-packages ). If you do not find thecv2.so bindings in site-packages , be sure to check dist-packages as well.
The last step here is to sym-link the OpenCV bindings into the cv virtual environment:
OpenCV should now be installed in /usr/local/lib/python3.4/site-packages :
For some reason, unbeknownst to me, when compiling the Python 3 bindings the output .so file is named cv2.cpython-34m.so rather than cv2.so .
Luckily, this is an easy fix. All we need to do is rename the file:
Followed by sym-linking OpenCV into our cv virtual environment:
At this point, OpenCV 3 should be installed on your Raspberry Pi running Raspbian Jessie!
But before we wrap this tutorial up, let’s verify that your OpenCV installation is working by accessing the cv virtual environment and importing cv2 , the OpenCV + Python bindings:
You can see a screenshot of my terminal below, indicating that OpenCV 3 has been successfully installed:
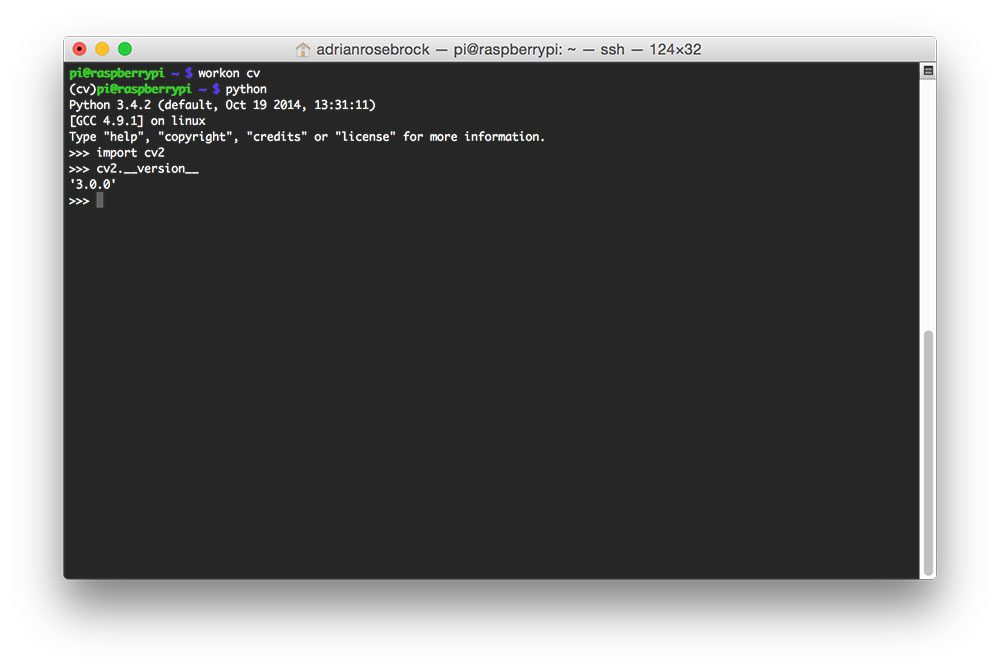
Figure 5: OpenCV 3 + Python 3 bindings have been successfully installed on my Raspberry Pi 2 running Rasbian Jessie.
